> ## Documentation Index
> Fetch the complete documentation index at: https://art.openpipe.ai/llms.txt
> Use this file to discover all available pages before exploring further.
# Open Deep Research Tutorial
> Train a deep research agent to exceed SOTA performance using GRPO and SFT.
This tutorial demonstrates how to train your own deep research agent using GRPO to exceed Sonnet 4's perfromance. Specifically, you will be using the [ART](https://github.com/OpenPipe/ART) library to specialize Qwen2.5 14B for [Langchain's open deep research](https://github.com/langchain-ai/open_deep_research) framework, and will evaluate your agent's performance using [DeepResearch Bench: A Comprehensive Benchmark for Deep Research Agents](https://github.com/Ayanami0730/deep_research_bench).
In addition to the GRPO training step, you will also run an initial SFT training run to improve the model's baseline performance.
Reading time: 45 min
Training time: 30 hr
Total cost: \~\$350
### Step 1: Clone the starter repo and install dependencies
To get started, clone [Open Deep Research Training](https://github.com/OpenPipe/open_deep_research_training), which contains the following pieces of our RL pipeline:
* The deep research agent environment
* The reward function based on DeepResearch Bench
* SFT and GRPO training scripts
* Evaluation benchmarks
Once the repository is cloned, install dependencies. If you haven't already, install `uv` by following the instructions [here](https://docs.astral.sh/uv/getting-started/installation/).
Then install the project dependencies by running `uv sync`.
### Step 2: Install backend dependencies and provision a GPU
You'll be using `LocalBackend` to manage the GPU that your model will be trained on. Install ART with the backend dependencies:
```bash theme={null}
pip install openpipe-art[backend]
```
Make sure you have access to a machine with one or more modern NVIDIA GPUs. This can be your local workstation or a cloud VM. If you're using a cloud provider, launch the GPU instance and run the rest of this tutorial on that machine.
### Step 3: Set up optional environment variables found in `.env.example`
Copy `.env.example` to `.env` at the root of the repository, and fill in the values for the environment variables. If you're unsure about any of the values, refer to [ENV\_INSTRUCTIONS.md](https://github.com/OpenPipe/open_deep_research_training/blob/main/ENV_INSTRUCTIONS.md).
### Step 4: Run the training scripts
You'll want to run these scripts in this order:
```bash theme={null}
uv run collect_sft.py # Collect samples for your sft training run. ~1 Hour
```
This script collects supervised fine-tuning data by running the research agent on a subset of the DeepResearch Bench dataset. The collected trajectories will be used to improve the model's baseline performance before RL training.
```bash theme={null}
uv run run_sft.py # Run your sft training run. ~1 Hour
```
The SFT training step improves the model's ability to follow the research agent format and reasoning patterns. This creates a better starting point for the subsequent RL training.
```bash theme={null}
uv run run_train.py # Run your rl training run. 1+ Day
```
This is the main GRPO training loop where the model learns to optimize its research strategies based on feedback from the DeepResearch Bench evaluation framework.
The first training run will:
* **Spin up a cluster with 1 or more H200 GPUs.**
* This usually takes about 10 minutes, but RunPod occasionally has network throughput issues that can cause the cluster to take up to 30 minutes to spin up.
* **Register the model with ART.**
* This usually takes less than 5 minutes, though it can require up to 30 minutes if RunPod experiences network issues.
* **Download the model checkpoint.**
* Usually takes a few minutes depending on the model size.
* **Train the model for a specified number of steps.**
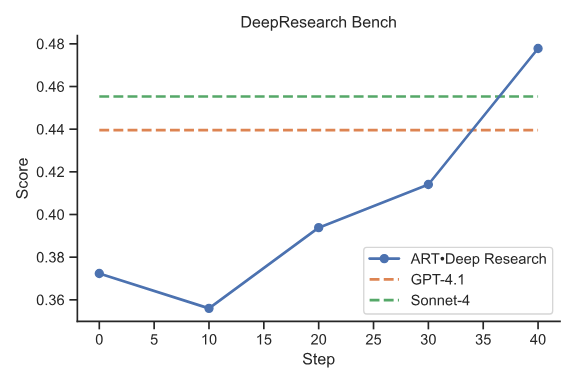
* Each RL step involves running the research agent on a subset of benchmark questions, and updating the model based on the rewards. We hold out another randomly-selected subset of 10 questions (10% of the total benchmark) that are never used in training that we run evaluations on every 10 steps to make sure the model is still making progress. Training time depends on the number of steps and the complexity of each research task.
* **Upload the final model checkpoint.**
* This usually takes a few minutes.
### Step 5: Generate the benchmarks
Run the benchmark script to evaluate your trained models:
```bash theme={null}
uv run evaluate/benchmark_model.py
```
This script will:
* Run each benchmarked model through the DeepResearch Bench evaluation
* Compare performance against baseline models (GPT-4.1, Sonnet 4, etc.)
* Generate accuracy metrics and detailed results
Then run the `display_benchmarks.ipynb` notebook to visualize the results and generate comparison charts.
### Step 6: Shutting down your GPU instance
When you're done training and running benchmarks, shut down your GPU instance through your cloud provider's console or CLI. If you're running locally, you can stop the training process.
## Training Results
After completing the full training pipeline, you should see results similar to the chart at the beginning of this tutorial. The trained model typically shows:
* Improved accuracy on research questions compared to the base model
* Better structured research approaches
* More comprehensive information gathering
* Higher quality synthesis of research findings
The benchmark comparison will show how your trained model performs relative to leading commercial models like GPT-4.1 and Sonnet 4.
## Next Steps
Your model is trained and portable! Upload it to any platform you choose, including HuggingFace and inference providers like Together and Fireworks.
To learn more about ART, check out another tutorial or look through our notebooks! As always, the [ART Discord](https://discord.gg/zbBHRUpwf4) is a great place to ask questions and share results!
Train a summarizer model to outperform Sonnet 4 and GPT-4.1.
Train a variety of agents in free Colab notebooks.